Cookie Recipes
now browsing by category
Like to bake some cookies for your little monsters? We’ll show you how with some great Cookie recipes.
Hey, were not going to publish our secret recipes but there are plenty of other good bickkie recipies around.
The Best Biscuits For Yogurt Cheesecake
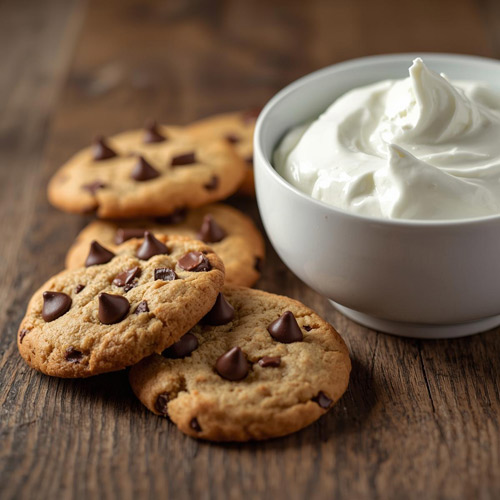
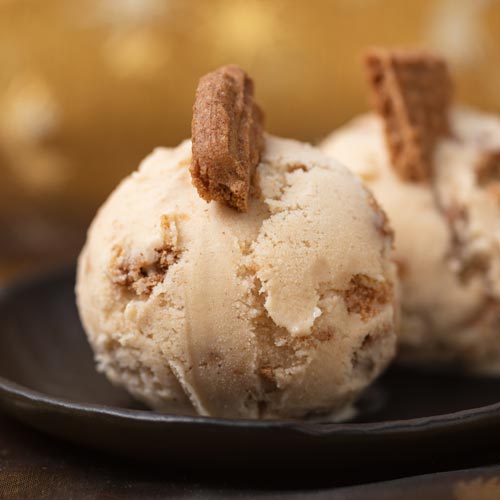
The viral yogurt cheesecake recipe works because of physics. Greek yogurt is thick and tangy. Hard biscuits are dry and sweet. When you introduce one to the other over several hours in a sealed container, moisture transfers, textures shift, and somehow you end up with something that genuinely tastes like cheesecake without any of the actual cheesecake.
But which biscuit you choose for yogurt cheesecake matters far more than most people realise. Not all biscuits absorb moisture the same way. Not all of them distribute flavour evenly through yogurt. And crucially, not all of them are made with the kind of genuine ingredients that actually improve when they soften into creamy yogurt.
Here’s where Bush Cookies from Opera Foods enter the conversation.
What Are the Best Biscuits for Yogurt Cheesecake?
Vanilla Melting Moments
Most yogurt cheesecake recipes rely on Biscoff or digestive biscuits. Functional. Fine. But our Vanilla Melting Moments bring something different: a cream filling sandwiched between two shortbread halves.
As the biscuits soften in yogurt, both the shortbread and the cream filling absorb moisture, but in different ways. The shortbread dissolves gradually into the yogurt, whilst the cream filling softens into a custard-like texture that stays largely intact. After six hours, you get these pockets of vanilla cream throughout—soft, sweet, almost pudding-like—contrasting against the dissolved shortbread that’s merged with the yogurt.
It’s textural complexity that plain biscuits can’t deliver. You’re not just eating yogurt that tastes like biscuit. You’re eating yogurt with actual cream pockets distributed throughout.
Anzac Biscuits
Anzac biscuits feel out of place for this 2-ingredient yoghurt cheesecake. They’re rustic. Golden syrup and coconut. Historically Australian. Nothing about them screams “viral Japanese dessert.” Yet they deliver something that sweeter, softer biscuits don’t.
The coconut brings texture that actually survives the yogurt absorption process. Unlike some biscuits that can soften into near-dissolution, our Anzac biscuits maintain subtle structural integrity even after twelve hours. The golden syrup creates a caramelised depth that complements yogurt’s tartness rather than fighting it. The oats add an earthiness that feels almost wholesome in comparison to other options.
When Anzac biscuits soften into Greek yogurt, they still taste like themselves.
Passionfruit Creams
Passionfruit cream biscuits introduce a distinct tropical fruit flavour into yogurt. The buttery, crumbly shortbread holds the passionfruit flavouring—real fruit taste, not artificial—and as it softens into the yogurt, that flavour gradually disperses throughout.
You get soft fragments of buttery shortbread distributed through the yogurt, carrying passionfruit notes with them. The cream filling, meanwhile, softens into its own pockets, providing sweetness and richness that balances the fruit flavour.
Coffee Creams
Coffee creams create something surprising: a yogurt cheesecake that tastes like tiramisu. The combination of coffee biscuit and Greek yogurt’s natural tang produces that same sophisticated, slightly bitter-sweet character without any of the complexity of the original dessert.
As the biscuits soften, the coffee flavour bleeds gradually into the yogurt. The cream filling holds its own pockets of sweetness. What emerges is a dessert that sits between breakfast and dessert—creamy and substantial like cheesecake, but with the clean, bright edge that coffee brings. The tartness of the yogurt becomes a feature rather than something to balance. It cuts through the richness in exactly the way the coffee biscuit intended.
This only works if the coffee flavour is genuine. The right biscuit makes the dessert sing.
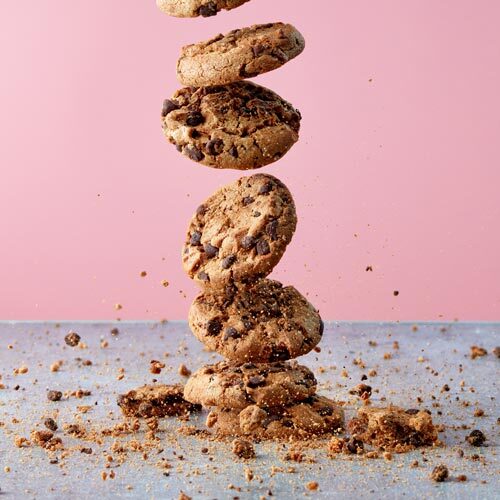
Chocolate Chip Cookies
This is the one everyone reaches for. Handmade chocolate chip cookies generously filled with actual chocolate. When they soften into yogurt, they bring what people actually want: chocolate flavour distributed throughout the dessert.
The chocolate doesn’t disappear. It’s there in every spoonful. As the cookie dissolves, the chocolate pieces release their flavour into the yogurt, creating something that tastes fundamentally like chocolate cheesecake without requiring any eggs, cream cheese, or oven time. It’s straightforward. It works. There’s no complexity to explain away, just creamy yogurt with chocolate cookie and genuine chocolate throughout.
People love chocolate. Chocolate chip cookies more than deliver.
Why Use Handmade Biscuits?
Handmade Bush Cookies use real ingredients. The texture is what happens when you work with real materials: buttery, crumbly, with actual character.
When these biscuits soften into yogurt, what you taste is straightforward. Real ingredients softening into real yogurt.
The viral trend works because yogurt cheesecake is genuinely simple. Two ingredients. Patience. When you’re working with only two things, both of them matter. The better the biscuit, the better the outcome.
How Do You Make Yogurt Cheesecake?
Insert four to five biscuits vertically into 200–250ml of full-fat Greek yogurt. Seal. Refrigerate for four to twenty-four hours. Longer refrigeration creates softer integration. Shorter refrigeration preserves more biscuit texture. Both are fine. The biscuit choice determines the outcome far more than the timing.
That’s genuinely it. The method isn’t the story. The biscuit is.
Yogurt Cheesecake FAQs
Q: How long does yogurt cheesecake last in the fridge?
A: Yogurt cheesecake lasts 3-4 days in a sealed container. The biscuits remain soft and the yogurt stays fresh throughout this window.
Q: Can you use any type of yogurt for yogurt cheesecake?
A: Full-fat Greek yogurt works best. It creates the richest, most creamy texture that most closely resembles traditional cheesecake. Low-fat or zero-fat versions create a thinner, less satisfying consistency.
Q: Do the biscuits get soggy in yogurt cheesecake?
A: They soften rather than go soggy. The biscuits absorb moisture and gradually integrate into the yogurt whilst maintaining some structural character depending on which biscuit type you choose.
Q: Can you make yogurt cheesecake ahead of time?
A: Yes—in fact, it requires 4-24 hours of refrigeration, making it ideal for advance preparation. You can assemble it in the morning and it will be ready to eat by evening or the next day.
Q: What biscuits work best for yogurt cheesecake?
A: Cream-filled biscuits like Vanilla Melting Moments, sturdy options like Anzac biscuits, and chocolate chip cookies all work beautifully. Each brings different texture and flavour characteristics to the final dessert.
Q: Why does biscuit quality matter in yogurt cheesecake?
A: Because there are only two ingredients, the quality of each one becomes critical. Handmade biscuits with real ingredients transform as they soften into yogurt in ways that deliver genuine flavour and texture.
Explore our full range of Australian Biscuits and Cookies today.
This article was reproduced on this site with permission from operafoods.com.au the “Handmade Australian Biscuit Suppliers”.
See original article:- The Best Biscuits For Yogurt Cheesecake
How to Make Perfect Icing for Cookies: A Step-by-Step Guide
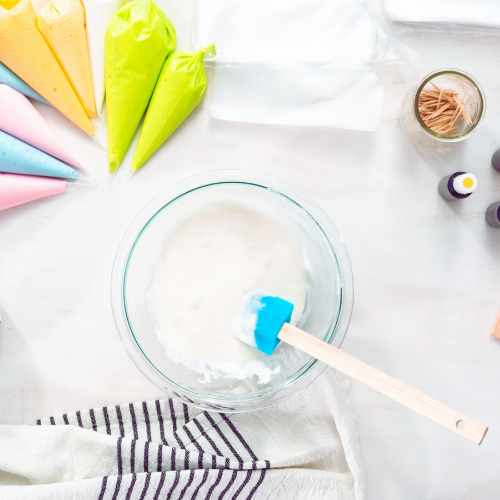
Cookies and biscuits are already awesome on their own, but with a bit of know-how, you can quickly (and easily) elevate them into something special. The right icing not only elevates the look of your cookies but also adds an extra layer of flavour and fun. Whether you’re preparing for a holiday season, a birthday party, or just a treat-yourself moment, this guide will walk you through everything you need to know to create perfect icing for cookies.
Types of Icing for Cookies
Before we jump into the details, let’s explore three popular types of cookie icing. Each one has its unique personality, so you’ll want to pick the best fit for your cookie project.
Royal Icing
What is it?
This smooth, hard-drying icing is perfect for detailed decorations. Think intricate snowflakes or lettering—it’s a true artist’s ally.
When to Use It
It’s ideal for sugar cookies that you want to decorate with precision and flair.
Glace Icing
What is it?
Glace icing is shiny, easy to spread, and dries with a softer finish than royal icing.
When to Use It
Perfect for creating simple designs, flooding large areas, or dipping cookies for a sleek look.
Buttercream Icing
What is it?
Creamy, rich, and incredibly flavorful, buttercream icing is more about taste than precision.
When to Use It
Best for cookies that don’t require intricate designs but need a pop of softly textured flavour and a pretty colour.
Ingredients You’ll Need
Each type of icing calls for slightly different ingredients. Here’s a quick shopping list to get you started
Royal Icing
- Powdered sugar
- Egg whites
- Water
- Optional: Vanilla extract or other flavourings
Glaze Icing
- Powdered sugar
- Milk or water
- Corn syrup (for that lovely shine)
- Optional: Flavour extracts
Buttercream Icing
- Unsalted butter (softened)
- Powdered sugar
- Milk or cream
- Vanilla extract
Got all that? Perfect. Now, onto the tools.
Tools You’ll Need
Creating beautiful, decorated cookies is much easier when you have the right tools. Here’s what you’ll need for success.
- Mixing bowls (at least two, but more is always handy!)
- Electric mixer (especially crucial for royal icing and buttercream)
- Piping bags and assorted tips
- Toothpicks (for fine details)
- Squeeze bottles for flooding cookies
- Spatula or spoon for mixing
If you don’t have piping bags, don’t sweat it—zip-top bags work in a pinch!
Recipes for Icing
A simple glace icing may seem foolproof, but buttercream is by far the most forgiving. So let’s start there.
Buttercream Icing Recipe
Here’s a simple and delicious recipe for classic buttercream icing that’s perfect for decorating cookies, as well as cakes, or cupcakes!
Ingredients:
- 1 cup (2 sticks) unsalted butter, softened
- 4 cups powdered sugar, sifted
- 2-3 tablespoons heavy cream or milk
- 1 teaspoon vanilla extract (or any flavouring you prefer)
- A pinch of salt
Instructions:
- Beat the butter – Using an electric mixer, beat the softened butter on medium speed until it’s creamy and smooth (about 2-3 minutes).
- Gradually add powdered sugar – Lower the mixer speed and slowly add the powdered sugar, one cup at a time, mixing well after each addition. Make sure to scrape down the sides of the bowl as needed.
- Add flavour and cream – Mix in the vanilla extract and a pinch of salt. Then, slowly add the heavy cream or milk, one tablespoon at a time, until you achieve your desired consistency—smooth and spreadable or slightly stiffer for piping.
- Whip it up – Once all ingredients are combined, increase the mixer speed to high and beat for an additional 2-3 minutes to give the buttercream a fluffy texture.
Your buttercream is now ready to use! Feel free to add food colouring for vibrant designs or additional extracts to customise the flavour to your liking.
If you’re not using it right away, store it in an airtight container and refrigerate. Just remember to bring it back to room temperature and re-whip before using!
Glace Icing Recipe
Glace icing is a simple and versatile topping that’s perfect for decorating cookies, cakes, or pastries. Here’s an easy recipe to make your own:
Ingredients
- 2 cups (250g) powdered sugar, sifted
- 3-4 tablespoons water or milk
- Optional: a few drops of food colouring or flavoured extract
Instructions
- Combine the ingredients – Place the sifted powdered sugar into a bowl. Add the water or milk a tablespoon at a time and mix until smooth. If the icing is too thick, add a little more liquid, a teaspoon at a time, until your desired consistency is reached. Too thin, and it is very difficult to bring back without lumps.
- Customise – To make your icing more colourful or flavorful, add a few drops of food colouring or extract, like vanilla or almond, and mix thoroughly.
- Use immediately – Spread or drizzle the glace icing over your baked goods using the back of a spoon or a piping bag for more precise designs. It will harden as it sets, so try to work quickly.
Glace icing dries to a smooth, shiny finish, making it ideal for decorating cookies and biscuits. It can be used for cakes, but tends to soak in, so you need to add a few layers.
Recipe for Traditional Royal Icing (Using Egg Whites)
Royal icing is a versatile icing that’s famously used for decorating cookies, assembling gingerbread houses, and adding intricate designs to cakes. Here’s a detailed recipe to make the perfect batch.
Ingredients
- 3 large egg whites
- 4 cups (1 lb) of powdered sugar, sifted
- 1 teaspoon fresh lemon juice
Instructions
- Prepare the egg whites – Carefully separate the egg whites from the yolks, ensuring no yolk gets into the whites. Place the egg whites in a clean, grease-free mixing bowl.
- Whisk the egg whites – Using a hand or stand mixer fitted with a whisk attachment, start whisking the egg whites on medium speed until they turn frothy.
- Add powdered sugar gradually – Reduce the speed to low and gradually add the sifted powdered sugar, one spoonful at a time. This ensures the sugar fully incorporates and the consistency stays smooth.
- Increase speed and whip – Once all the sugar is added, increase the mixer speed to medium-high and continue to beat the mixture until stiff, glossy peaks form. This usually takes about 5-7 minutes.
- Adjust to taste – Mix in the lemon juice. It is there to balance out sweetness and keep your white icing bright. If the icing feels too thick for your use, you can thin it out with a few drops of water; add slowly and mix well.
Flavour and Colour
Royal icing is not usually flavoured (although it can be), but you may want to add colouring. Just be aware that any liquid colour or flavour will water down the consistency. Gel colours are excellent for this purpose.
Tips for Best Use
- Consistency matters – For piping fine details, the icing should hold stiff peaks, but for flooding cookies, it should be slightly thinned to establish a smooth, flowy texture.
- Cover while working – Royal icing dries quickly when exposed to air, so keep the icing covered with a damp paper towel and plastic wrap while you’re working.
- Storage – Store any unused icing in an airtight container in the refrigerator for up to 3 days. Give it a quick mix before use as it may settle.
With its smooth texture and ability to harden to a durable finish, royal icing is perfect for both experienced decorators and beginners looking to add a professional touch to their baked creations.
Tips for Decorating Cookies
Once your icing is ready, it’s time for the fun part—decorating! Here are some handy tips to help you channel your inner cookie artist:
Consistency is Key
Royal icing should be thicker for piping and line work but slightly thinner for flooding. If it runs off the side of the cookie, it’s too thin.
Colour Carefully
Add food colouring sparingly to avoid altering the icing’s consistency. Gel colours are a great choice!
Layering Made Easy
Allow each layer of icing to dry before adding another. Patience pays off with crisp designs.
Store Smart
Leftover royal or glaze icing can be stored in an airtight container and used later. Buttercream, however, is best when fresh.
Common Mistakes to Avoid
Even seasoned bakers slip up sometimes, but these tips will keep your icing game strong.
Lumps Are Your Enemy
Always sift powdered sugar—it’s a step worth taking.
Don’t Overmix or Undermix Royal Icing
Overmixing can make it too stiff, while undermixing leaves it weak and runny. Aim for those perfect peaks!
Skipping Drying Time
Layers of icing need time to dry. Rushing leads to smudging and heartbreak (seriously).
Get Creative!
Icing cookies is all about having fun and letting your creativity shine. With your new skills, there’s no limit to what you can create—whether it’s a batch of vibrant, rainbow-hued treats or a classic white-and-gold design for wedding favours. Don’t be afraid to experiment, try new techniques, or even make mistakes (they’re part of the learning process).
Of course, you can always take a shortcut if you don’t have time to bake your cookies. Elevate our handmade Australian biscuits and cookies instead with your newly acquired icing skills.
This article was reproduced on this site with permission from operafoods.com.au the “Packaged Cookies Suppliers”.
See original article:- How to Make Perfect Icing for Cookies: A Step-by-Step Guide
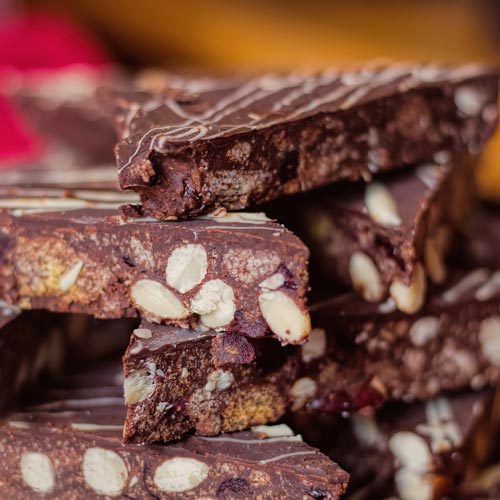
Make Christmas Chocolate Salami Your Next Holiday Hit

When you think of classic Christmas treats, chances are cookies, fruitcakes, and gingerbread come to mind. But if you want to surprise your holiday guests with something unique and utterly delicious, it’s time to bring chocolate salami into the spotlight. Don’t worry—it doesn’t involve actual meat! This European-inspired dessert combines rich, chocolatey flavour with crunchy textures, all rolled up to resemble a traditional salami. Intrigued? Keep reading to learn how to make this no-bake treat the centrepiece of your holiday celebrations.
What Is Chocolate Salami?
Don’t be fooled by the name—chocolate salami is entirely sweet. Originating in Europe and especially popular in Italy and Portugal, this dessert is a mix of chocolate, crushed biscuits, nuts, and sometimes dried fruits. The mixture is shaped into a log, chilled, and sliced to resemble the look of cured salami. It’s festive, fun, and far easier to make than you might think. Plus, it adds a touch of old-world charm to your holiday spread.
Perfect for gifting or serving at your next Christmas party, chocolate salami is the kind of treat that will have everyone asking for the recipe. The best part? There’s no need to turn on the oven!
How to Make Christmas Chocolate Salami
Here we use milk to keep the mixture soft and have added a festive touch with flavours of orange and the sharpness of cranberries.
Ingredients
Here’s what you’ll need (makes 1-2 logs, depending on size).
200g dark chocolate
100g unsalted butter, soft
2 tbsp golden syrup
2 tablespoons cocoa powder
75ml milk
2 tbsp Grand Marnier
200g choc chip cookies
50g almonds
50g mixed peel
zest of one orange
Icing sugar, for dusting
Instructions
1. Prepare Your Ingredients
Break the biscuits into small chunks, but don’t crush them completely—you want bite-sized pieces for a nice crunch.
If you’re using nuts, chop them roughly. Roast them briefly for extra flavour, if desired.
2. Melt the Chocolate
Use a heatproof bowl over a pot of simmering water to melt the dark chocolate. Stir occasionally until smooth and glossy. You can use the microwave but you need to work in short bursts and make sure it doesn’t burn.
3. Mix It All Together
Stir in the softened butter, syrup, cocoa powder, milk and liqueur until well combined.
Add the biscuits, nuts, dried fruit and orange zest. Mix gently to ensure everything is evenly coated in the chocolate mixture.
4. Shape the Salami
Lay out a large piece of plastic wrap or parchment paper. Spoon the mixture onto the wrap and shape it into a log.
Roll it up tightly, twisting the ends of the wrap like a candy wrapper to hold its shape.
5. Chill Until Firm
Place the log in the refrigerator for at least 3-4 hours, or until it’s completely firm. If you’re in a hurry, the freezer can speed things up.
6. Final Touches
Once firm, remove the wrap and dust the log with icing sugar to complete the “salami” effect. Slice into rounds and serve!
So there you have it. A quick and easy festive treat. Why not make a batch (or two) and share it with your loved ones this Christmas? Maybe even start a new tradition?
Don’t forget to check out our selection of Australian biscuits and cookies.
This article was reproduced on this site with permission from operafoods.com.au the “Australian Biscuits Wholesaler”.
See original article:- Make Christmas Chocolate Salami Your Next Holiday Hit
S’mores – Not Just For Outdoors

Many people associate s’mores with campfires and summer nights. Combining the crispy texture of cookies, the gooey goodness of toasted marshmallows, and the rich taste of chocolate, their popularity spans generations, evoking fond memories of gatherings with friends and family around a crackling fire.
Which is great. We cannot deny that the beauty of s’mores lies in that smoky campfire flavour and the memories they bring. But the flavour combo is so good, why save it for outdoors?
So, we say. Bring on the s’mores.
Why are s’mores called s’mores?
The name “s’mores” is a contraction of the phrase “some more,” which reflects the irresistible nature of these treats. Once someone has had a s’more, they often find themselves asking for “some more” because they’re simply too delicious to resist!
The origins of s’mores date back to at least the 1920s, with the earliest known recipe appearing in a U.S Girl Scouts publication. Since then, s’mores have become a staple of outdoor fun, symbolizing summer nights filled with laughter and tasty treats.
The Classic S’mores Recipe
Some would say it’s not a s’more without the smoke. So just in case you are new to this, here’s how you do it.
How to make s’mores at the campfire?
- Gather Your Ingredients: You’ll need biscuits, marshmallows, and chocolate bars. It’s also a good idea to have some roasting sticks handy for toasting your marshmallows.
- Build Your Fire: Start a campfire and let it burn down until you have a nice bed of glowing embers. This ensures an even heat for roasting your marshmallows.
- Toast the Marshmallows: Skewer a marshmallow on the end of your roasting stick and hold it over the fire. Rotate it slowly to ensure that it toasts evenly. Keep an eye on it and remove it when it’s golden brown and gooey, or darker if you prefer a more caramelized finish.
- Assemble the S’more: Take a biscuit and place a square of chocolate on it. Once your marshmallow is perfectly toasted, carefully place it on top of the chocolate. Finally, top it with another biscuit and gently press down to squish everything together.
- Let the chocolate melt: Allow the heat from the marshmallow to melt the chocolate a bit, then take a big bite.
How to make s’mores on a charcoal grill?
Making s’mores on a charcoal grill is a fantastic alternative when campfires aren’t an option. It’s simple and brings that same delicious gooeyness everyone loves.
There are two ways you could go about this. Either way, you want to start with your fire.
Start by lighting your charcoal grill and letting the coals burn until they’re covered with white ash. This indicates they’re ready for cooking and provides an even heat. Most likely, you will have cooked and eaten your meal, and are using the embers.
Similar to the campfire method, gather your biscuits, chocolate, and marshmallows.
Here, you can proceed pretty much as you would with a campfire, removing the grill grate and toasting skewered marshmallows in the embers.
Or you can assemble the s’mores as sandwiches and place them directly on the grill, or wrap them in foil and place them in the embers.
Creative Variations on Classic S’mores
A classic is a classic for a reason, and it is fairly hard to improve upon perfection. Then again, why not switch it up?
For a start, the classic American graham cracker is well, American. So you are going to want an alternative biscuit.
What biscuits to use for s’mores in Australia?
In Australia, while the classic s’mores use graham crackers, you can easily adapt the recipe using locally available biscuits. The obvious substitute is a Digestive biscuit.
Other popular commercial options include Arnott’s Marie biscuits, which provide a nice, subtle sweetness and a perfect crunch. Another favourite is the Malt-O-Milk biscuits, offering a unique flavour that pairs wonderfully with marshmallows and chocolate.
But why stop there? Why should Australian s’mores not be made with Anzac biscuits? Or chocolate chip cookies?
These macadamia biscuits could work really well.
Fun Variations on the Classic S’more
Swap out the chocolate for a layer of Nutella, and add crushed nuts for an extra crunch. Maybe include slices of fresh strawberries or bananas between the marshmallow and chocolate for a fruity twist. Or add a sprinkle of cinnamon or chili powder to the chocolate for a surprising, spicy element. There are many ways you could switch up a simple s’more.
S’mores For Different Seasons
Perhaps you want that whole gooey chocolatey biscuity marshmallowy thing now? Like indoors.
How to bake s’mores in the oven
Baking s’mores in the oven is a fantastic way to enjoy this beloved treat, especially when a campfire isn’t readily available. Here’s how you can create that classic s’mores experience right in your kitchen:
- Preheat Your Oven: Start by preheating your oven to 350°F (175°C).
- Prepare Your Baking Sheet: Line a baking sheet with parchment paper for easy cleanup. This will also prevent your s’mores from sticking.
- Layer the Ingredients: Arrange a layer of biscuits on the baking sheet. Place a piece of chocolate on top of each, followed by a generous amount of marshmallows. For an extra gooey experience, you can cut the marshmallows in half and lay them cut-side down over the chocolate.
- Bake: Pop the baking sheet in the oven and let it bake for about 5-7 minutes, or until the marshmallows are golden brown and the chocolate is melted. Keep an eye on them, as they can go from perfectly toasted to burnt quite quickly!
- Top and Serve: Once out of the oven, place another biscuit on top of each s’more to create a sandwich. Allow them to cool slightly before taking a bite.
Baking s’mores in the oven not only makes them accessible year-round but also allows you to whip up a larger batch to share with family and friends. Enjoy the warm, gooey goodness without ever leaving your home!
Explore our full range of Australian biscuits for more s’mores inspo!
This article was reproduced on this site with permission from operafoods.com.au the “Australian Biscuit Suppliers”.
See original article:- S’mores – Not Just For Outdoors
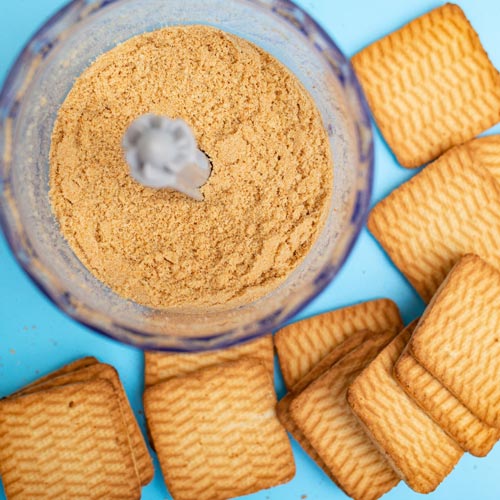
Biscuit Base For Cheesecake And Beyond

If there is one thing we love more than biscuits, it is a biscuit base. Because what’s not to love above biscuits plus butter? Most well-known as a cheesecake base, the uses for this simple mix of biscuit crumb with melted butter go far beyond just cheesecake. In this article, we take a closer look at how to get the most from your biscuit base.
What Is A Biscuit Base?
A biscuit base is a mixture of finely crushed biscuits combined with melted butter to make a simple crust for various desserts. Typically used for cheesecakes and tarts, the biscuit base provides a crunchy, flavorful contrast to creamy fillings. The recipe is hugely adaptable, creating a range of different tastes and textures.
Classic uses for a biscuit base
Some desserts naturally spring to mind at the mere mention of a biscuit base.
Cheesecake: One of the most popular desserts featuring a biscuit base, offering a crunchy foundation to the creamy, rich cheese mixture on top.
Banoffee Pie: Known for its sweet banana and caramel layers, this dessert uses a biscuit base for added texture and flavour.
Key Lime Pie: The biscuit base complements the refreshing lime filling, delivering a hint of sweetness to balance the tartness.
Then there are others that although classically made with pastry, are natural contenders for a biscuit base.
Chocolate Tart: A classic choice where the biscuit base supports a luscious, silky chocolate ganache.
Lemon Tart: The crisp biscuit base perfectly contrasts the tangy lemon filling.
How To Make Cheesecake Base
Nothing could be simpler than making a biscuit base for cheesecake, but there are several ways in which it could go wrong. Learning how to adapt the recipe will give you full control over not just the taste but that all-important texture.
The main ingredients for a biscuit base are biscuits and butter. That much is fairly obvious. But which biscuits are best, and for that matter, which butter?
Butter is pretty straightforward. You have salted, and you have unsalted. Which one you use depends on how salty your biscuits are, and how salty you want the base to be. Sometimes, you may want to keep that saltiness to a minimum, yet at other times you may want to play around with it and bring it to the fore. Think peanut butter pie, for example.
As butter is a key ingredient, go for the best quality butter you can. There are even lots of different types of butter ranging from the pale and creamy continental types to the more robust yellow varieties. Plain old supermarket butter will make a great cheesecake base, but why not play around and see what you can achieve by simply switching out your butter type?
And then there are biscuits. We do love a good biscuit, but which is better for our biscuit base?
Best Biscuits To Use For Cheesecake Base
When it comes to selecting the best biscuits for a cheesecake base, the key is to find ones that complement the flavour of your filling while providing the right texture. Digestive biscuits may be the classic choice due to their slight sweetness and crumbly texture, and there are times when you just don’t mess with the classics, but surely we can do better than that.
You can use any biscuits for a cheesecake base as long as they are crispy/crumbly rather than soft/chewy. It needs to be dry enough to break down easily into crumbs, and then absorb (or at least be coated with) the butter. Different biscuits vary in how much butter they absorb, so you might need to adjust your proportions to get the right consistency for your base.
A food processor is a handy tool, especially when working with chocolate-coated or cream-filled biscuits, as it helps achieve a uniform crumb. Cream-filled biscuits can lead to a softer, sweeter crumb, making them an exciting choice to experiment with. Chocolate-coated biscuits add a chocolate flavour, but also a different textural element.
Why not try?
Our Anzac biscuits for a classic oaty Australian crunch.
Try these ginger and macadamia biscuits for a hint of spice.
What about a triple chocolate chip cookie for an extra chocolatey base?
These passionfruit creams could offer creative inspiration for a fruity dessert.
Gluten-free? That’s simple, go for a gluten-free biscuit. You might need to experiment as the gluten-free crumb may behave differently.
Ultimately, the best biscuits to use will align with the flavour profile you desire and will balance the texture and taste of the cheesecake/dessert as a whole.
Cheesecake Base Recipe
This will line the base of a 23cm round tin. If you want to press the mixture up the sides, make twice the recipe.
250g biscuits
125g butter, melted
- Blitz the biscuits in a food processor to a fine crumb. Or, put them in a plastic bag and bash them with a rolling pin. Whichever you choose, you want something that looks like damp sand.
- Tip the crumb into a bowl. Even if you used a food processor.
- Stir the butter into the crumb using a wooden spoon or spatula. You want something that just sticks together.
- Press the mixture gently into the tin and set in the fridge for half an hour before filling.
- You can pile the crumb loosely onto a baking tray and set it without pressing it to form a crumble.
Tips and tricks for the perfect biscuit base
- Choose the Right Biscuit: Select a biscuit that complements your filling. A sweeter biscuit like double chocolate works well with tangy fillings, while plain biscuits can balance rich, creamy textures.
- Get the Consistency Right: Aim for a crumb consistency similar to damp sand. Too coarse and it won’t hold together; too fine, and it might turn mushy.
- Avoid Over-Pressing: When pressing the crumb mixture into the tin, apply gentle pressure. Over-pressing can lead to a dense, hard base.
- Melt the Butter Properly: Ensure the butter isn’t too hot when mixing it with the crumb, as this can cause the crumbs to become greasy or soggy.
- Experiment with Flavours: For extra flavour, consider adding a pinch of cinnamon, nutmeg, or even a splash of vanilla extract to the crumb mixture.
- Chill for Firmness: Allowing the base to chill for at least 30 minutes helps it firm up, ensuring it’s sturdy enough to support the filling.
- Test Different Ratios: Depending on the thickness you prefer, you might need more or fewer biscuits. Experiment with proportions to find your perfect balance.
- Use Parchment Paper: Lining the tin with parchment paper can help easily lift out the base without breaking it.
Frequently Asked Questions
Common issues and how to solve them, like a crumbly or overly firm base.
Why is my cheesecake biscuit base so hard?
A hard cheesecake biscuit base is often the result of pressing the crumb mixture too firmly into the tin. While it’s important to compact the crumbs so they hold together, over-pressing can lead to a dense and difficult-to-cut base.
Additionally, using too much butter can create a harder texture. To fix this, apply light pressure when spreading the mixture into your tin and ensure you’re using the right amount of butter, just enough to bind the crumbs together.
Finally, make sure the crumbs are not too finely processed, as this can also contribute to an overly firm base. Adjusting these factors should help you achieve a lighter, more manageable base.
Why is my cheesecake biscuit base too crumbly?
The opposite end of the spectrum is a base that is too crumbly.
A crumbly cheesecake biscuit base is typically due to not using enough butter or not compressing the mixture sufficiently.
Butter acts as the binding agent, so if the crumbs aren’t holding together, it’s likely that there’s not enough of it. Make sure you’re using the correct ratio of butter to biscuits; if necessary, slightly increase the butter until the mixture holds together when pressed.
Additionally, ensure you’re pressing the mixture evenly and firmly into the tin. Were your crumbs too coarse, or too fine? Getting the balance right is essential; damp sand, remember? Correcting these steps should help create a base that stays intact without falling apart.
Can I make a vegan biscuit base?
Absolutely, you can make a vegan biscuit base! The key is to replace traditional butter with a plant-based alternative. Also, ensure that the biscuits you’re using are vegan-friendly—many store-bought options are already free from animal products, but it’s always good to double-check the label.
Vegan butter or margarine works wonderfully as a binding agent, much like its dairy counterpart. You do need to be mindful of water content in vegan butter alternatives, which may result in a softer and less crumbly base.
Coconut oil could be your best bet, as it melts but sets solid just like butter.
Just follow the same general guidelines: mix the vegan butter with your crushed biscuits to achieve a sand-like texture, press lightly into your tin, and voilà—you’ve got a delicious vegan base ready for your cheesecake.
Creative Ideas For Biscuit Base
Make it interesting
There are loads of things you can do to add interest to your base.
Add Nuts or Seeds
Incorporate crushed nuts or seeds like almonds, walnuts, or chia for an extra crunch and nutty flavour.
Mix in Spices
Add a pinch of cinnamon, nutmeg, or cardamom to your crushed biscuits for a warm, inviting aroma and taste. Vanilla powder is an excellent alternative to the usual paste or essence.
Citrus Zest
Blend in some lemon, lime, or orange zest with the biscuit crumbs to give your base a fresh and zesty kick.
Incorporate Cacao
For chocolate lovers, mixing in some cacao powder with your base can add richness and depth. Or even cacao nibs.
Go beyond cheesecake
Not just for cheesecake base or a classic banoffee pie, biscuit base is a really easy dessert solution and most people love it. Here are a few ideas to kickstart your creativity.
Mini Tarts
Use the biscuit base to create individual tart shells, and fill them with your favourite custard, fruit, or chocolate mousse.
Ice Cream Cups
Make mini cookie cups with the biscuit base, then add a scoop of ice cream for a delightful treat.
Caramel Slice
Layer the base with caramel and chocolate for a decadent no-bake treat.
Chocolate Bark Base
Spread melted chocolate over a pressed biscuit base, sprinkle with nuts or dried fruit, then break into pieces for a crunchy chocolate bark.
Peanut Butter Bars
Combine peanut butter with cream cheese and spread over a set biscuit base. Set in the fridge for an easy, no-bake treat.
Brownie Bottom Bars
Use the biscuit base as a crust, add your brownie batter on top, and bake for a crunchy twist on traditional brownies.
Lemon Bars
Pour a tangy lemon filling over the biscuit base and bake until set for a refreshing and citrusy bake.
Get creative with crumb
There are also many different ways you could play with the texture, beyond pressing it into a base. You could leave it to set as is, for a light yet crispy crumb. Or, you could press it into a tin, and then once set break it up into crunchy crispy chunks.
Individual cheesecakes
Pile into individual glasses and top with cheesecake mix or even mousse.
Layer into parfait
Layer with fruit and yoghurt for a decadent twist on a classic parfait.
Sprinkle over ice cream
Add some buttery biscuit texture to a simple bowl of ice cream.
Fruit Crumble
Sprinkle biscuit crumbs over baked fruit mixtures to add a buttery, crispy topping for an easy fruit crumble.
Trifle Layers
Replace traditional cake layers with biscuit base crumbs for a twist on classic trifle desserts.
A final word
So you see, a pack of biscuits and some butter can open up a world of creative possibilities in the kitchen. The versatile biscuit base serves as a foundation for countless desserts. You can experiment with textures by setting the base whole, pressing it for a crunchy layer, or crumbling it into crunchy toppings that elevate simple desserts into something special.
Whether you’re aiming for a quick snack or an impressive dish for a gathering, these ideas ensure your creations are always exciting and delicious. The next time you reach for biscuits, consider these options and let your imagination guide you to sweet perfection.
Don’t forget the biscuits! Check out our full range of traditional Australian baked biscuits for more inspo.
This article was reproduced on this site with permission from operafoods.com.au the “Packaged Cookie Suppliers”.
See original article:- Biscuit Base For Cheesecake And Beyond
10 Things You Can Do With a Chocolate Chip Cookie

Chocolate chip cookies are an iconic treat loved by people of all ages, and while they are truly awesome on their own, their potential extends far beyond a simple snack. These store cupboard favourites can be the star of countless culinary creations, whether adding a buttery biscuity chocolatey twist to traditional ideas or using it as an inventive ingredient in unexpected ways.
Here, we’ll explore ten surprisingly lovely things you can do with a chocolate chip cookie, demonstrating just how versatile this not-so-humble cookie can truly be.
1: Dunk it in Milk
Not exactly groundbreaking, but it’s a classic for a reason. Dunking in a glass of cold milk is still most folks’ favourite thing to do with a chocolate chip cookie.
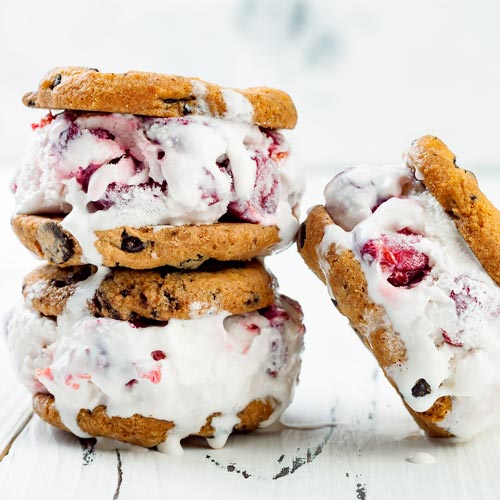
2: Squish Together an Ice Cream Sandwich
Use two cookies to make the perfect homemade ice cream sandwich. Just squish your favourite ice cream in between! If you want to elevate it slightly into the ultimate treat, try our recipe below.
Try our recipe for triple chocolate and salted caramel ice cream sandwiches. No baking required!
3: Crumble Some Crunchy Cookie Crumbs
Crush your cookie into crumbs and use them as a sweet topping for ice cream or yoghurt. Not just for sprinkling, you can also dip or roll.
These biscuit truffles are just one way to make use of cookie crumbs
4: Make Deliciously Moreish Cookie Butter
Blend your cookies into a food processor until they become a smooth, creamy spread. Enjoy it on toast, pancakes, or straight from the jar!
5: Supercharge That Trail Mix
Add some crumbled cookies to your trail mix for an extra sweet surprise.
6: Get More From Your S’mores
Replace the traditional graham cracker in a s’more with a chocolate chip cookie for a decadent treat.
7: Load Up Your Cheesecake Base
Crush cookies and mix them with melted butter for a quick and easy cheesecake base.
Read the ultimate guide to making a biscuit base.
8: Stick ‘Em Up Cookie Pops
Stick a pop stick into your cookie, dip it in melted chocolate, and decorate it with sprinkles for a fun snack.
9: Quick and Simple Cake Decorations
Use cookie pieces as edible decorations on cakes or cupcakes.
10: Gift Wrap It!
Sometimes it is the little things that matter and simple says it best of all. Who wouldn’t love a beautifully packaged chocolate chip cookie as a gift, and it’s the perfect way to show someone you care. A pretty bow or a cute little box (or both) is an inexpensive way to melt their heart. Make a statement with a single solitary cookie, or say thank you with a whole packet.
Check out our range of chocolate chip cookies. You may need more than one pack so luckily we’ve got some great bulk buy deals!
This article was reproduced on this site with permission from operafoods.com.au the “Australian Biscuit Manufacturers”.
See original article:- 10 Things You Can Do With a Chocolate Chip Cookie
How to Make Anzac Biscuits

Anzac biscuits are more of an institution than a recipe set in stone. There are very few rules, and variations are practically part of the tradition. So, how to make Anzac biscuits?
Nothing says homemade quite like an Anzac biscuit. There is absolutely nothing wrong with buying them (in fact we positively encourage it – our Anzac biscuits are great) but here’s what you need to know.
How to make Anzac biscuits
Making Anzac biscuits is fairly similar to making flapjack. But with coconut. Purists will want to stick with the original concept, yet we love it with a few cherries and raisins thrown in too. The basic recipe is pretty foolproof; a lot of baking is about precision but there is very little that can go wrong.
The recipe can be tweaked, according to whether you like your Anzac biscuits chewy or crunchy. The original biscuits destined for soldiers were crunchy in order to last longer, but many people prefer a softer chewier flapjack type biscuit.
There are a few ways in which you can control the outcome. More sugar, generally makes for a crisper cookie. For a chewier version, more butter helps to bring in more moisture. You can also experiment with bake time; less time for a chewy biscuit and more for a crisper texture.
Recipe for Anzac biscuits
1 cup plain flour
1 cup oats
1/2 cup coconut
1/2 cup caster sugar
150g butter
2 tbsp golden syrup
1/2 tsp bicarb
- Pre heat the oven to 180C/350F.
- Mix the dry ingredients in a mixing bowl.
- Melt the butter and syrup gently in a saucepan.
- Remove the pan from the heat and stir in the bicarb. Make sure there is room in the pan to allow for it bubbling up.
- Stir the buttery mixture into the dry ingredients and mix well.
- Roll into balls of about 1 tablespoon and place on a baking tray with a sheet of greaseproof paper, leaving plenty of space for them to flatten and spread.
- Press the balls with a fork to flatten.
- Bake for about 12 minutes until golden brown.
- Cool on a wire rack and once cold store in an airtight tin.
Find out more about Australia’s favourite handmade biscuits or browse our selection of Australian biscuits.
This article was reproduced on this site with permission from operafoods.com.au the “Aussie Biscuit Distributorss”.
See original article:- How to bake Australian Anzac biscuits
10 great biscuit ideas for things to make with biscuits and cookies
We all know that biscuits are pretty special just as they are, but how do you take your biscuit game further? Here are 10 great ideas for making treats with biscuits. It doesn’t matter if they are leftover, broken, or bought for purpose; just that they are easy to make and delicious to eat.
Chocolate Biscuit Cake
An Aussie classic of chocolate cookies layered with chantilly cream. Left in the fridge overnight to settle, the biscuits become soft but not soggy. This one is a total no brainer.

1 pack triple chocolate chip cookies
2 cups whipping cream
2 tbsp icing sugar
1 tsp vanilla paste
Chopped chocolate to garnish
- Whip the cream softly with the vanilla and icing sugar
- Spread about 1 tbsp of the whipped cream on each biscuit and layer in stacks of 4 to form a log shape.
- Spread the rest of the whipped cream over the top and sides.
- Garnish with chopped chocolate and put in the fridge overnight.
- Serve in slices.
Ice Cream Cookie Sandwich
What could be better than a scoop of your favourite ice cream sandwiched between two biscuits. It might be a melty moreish mess, but isn’t that the point?
Take one pack of your favourite Bush Cookies and a tub of ice cream. Take the ice cream from the freezer to soften just a little. Sandwich one scoop between two biscuits and eat!
Quick Cookies and Cream Ice Cream
Another super simple idea that is a great way to use up leftover biscuits and save a little money at the same time. You can make as much or as little as you like so it is also a great way to use up all those remaining ice cream tubs at the bottom of the freezer.
Ice cream in one flavour or more.
Leftover biscuits broken into chunks.
- Allow the ice cream to soften just enough so you can fold through the chunks of biscuit.
- Place back in the freezer to firm back up a little.
Ginger and Macadamia Biscuit Butter
We are not sure when cookie butter became an actual thing, but we are not sure how we ever lived without it. We have used our ginger and macadamia biscuits but you can experiment with any biscuit you like. Just be aware that you may need to adjust the water quantities accordingly.

1 pack of Bush Cookies ginger and macadamia biscuits
1 cup boiling water
1/4 cup butter
1/4 cup condensed milk
- Blitz the biscuits in a food processor until you have a fine crumb.
- Pulse in the boiling water and mix to a smooth paste.
- Blend in the butter and the condensed milk until smooth.
- Scrape into a glass jar and keep in the fridge for up to two weeks.
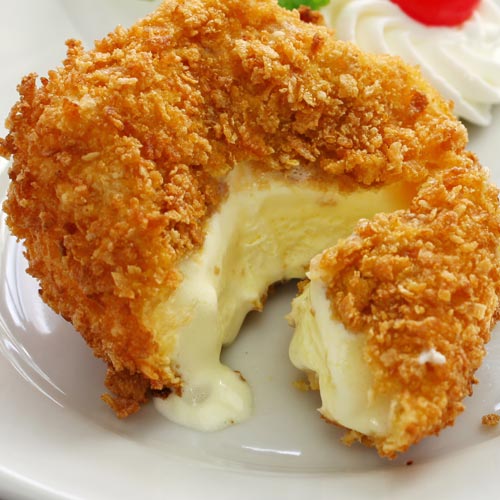
Deep Fried Ice Cream
Deep fried ice cream delivers on all levels. That classic contrast of hot against cold is doubly delicious when paired with the joy that is crispy plus creamy. We rest our case.
Serves 4
500ml ice cream
200g biscuits
2 eggs
- Scoop the ice cream into 4 balls. Put them on a tray, on greaseproof paper, and refreeze until solid.
- Beat the eggs.
- Blitz the biscuits to a crumb.
- Heat oil in a deep fryer to 190C.
- Roll the ice cream balls in the beaten egg.
- Roll them in the crumb.
- Drop into the hot oil and fry for about 20 seconds or until they turn a lovely golden brown.
- Drain on kitchen paper and serve hot.
Biscuit Fridge Cake
A simple staple that is way more than the sum of its parts. You can add in any bits that you like, and switch it up according to the season. Or if you want to get really fancy, roll it in a log and call it chocolate salami.
1 can condensed milk
3/4 cup butter
1 cup chocolate chunks
1/4 cup glace cherry halves
1/4 cup hazelnuts, roughlychopped
1/4 cup raisins
1 pack biscuits
- Line a tin or any shallow container with greaseproof paper
- Break the biscuits into a large bowl and stir through the cherries, hazelnuts and raisins.
- In a small pan over a low heat, melt the butter, condensed milk, and chocolate together.
- Mix this into the biscuits.
- Press into the tin and chill in the fridge for several hours or until set.
Biscuit Base
Possibly the most versatile thing ever, a good biscuit base will see you through the trickiest of dessert disasters. You can use as a cheesecake base, or its many variations. Banoffee pie, anyone? Or you can miss out the middle man and pile loosely underneath, or on top, of any fruity/creamy/chocolatey concoction. You could even sprinkle it on top of the cream on your hot chocolate – in this instance you could skip the butter and go straight to crumbled biscuits instead. Oh yeah!
This will line the base of a 23cm round tin. If you want to press the mixture up the sides, make twice the recipe.
250g biscuits
125g unsalted butter, melted
- Blitz the biscuits in a food processor to a fine crumb. Or, put them in a plastic bag and bash with a rolling pin. Whichever you choose, you want something that looks like damp sand.
- Tip the crumb into a bowl. Even if you used a food processor.
- Stir the butter into the crumb using a wooden spoon or spatula. You want something that just sticks together.
- Press the mixture gently into the tin and set in the fridge for half an hour before filling.
- You can pile the crumb loosely onto a baking tray and set without pressing to form a crumble.
Biscuit Truffles
Super simple chocolaty truffles are elevated in taste and texture by the addition of biscuits. You can use just biscuit crumb, or go for the double whammy and stir in some chunky biscuit bits too. The contrast of texture is enough to cause excitement but why not try using 2 different kinds of biscuits too? Oh my!

350g biscuits
100g broken biscuits, in small pieces
40g cocoa
395g tin of condensed milk
- Blitz the biscuits to a fine crumb in a food processor and set aside 100g.
- Mix together the rest of the biscuits, cocoa and condensed milk.
- Stir in your chopped biscuits if using.
- Divide the mixture using two teaspoons and roll into balls.
- Roll the balls, whilst still sticky, in the remaining crumb.
- Set aside to harden a little before eating.
For extra texture, roll the truffles in tempered chocolate before rolling in the crumb.
Lime, Coconut & Macadamia Biscuit Bars
When it comes to making quick (no)bakes with leftover biscuits, condensed milk is your store cupboard saviour. These lime biscuit bars are a super easy fridge cake, and although you could add frosting to the top, all they really need is a dusting of icing sugar.

1 pack of Bush Cookies macadamia delight biscuits
1/2 cup desiccated coconut
125g butter
1/2 can condensed milk
2 limes, juice and zest
icing sugar, to dust
- Blitz the biscuits to a fine crumb and stir in the coconut with the lime zest.
- Melt the butter, lime juice and condensed milk together.
- Stir the wet ingredients into the dry.
- Press into a lined tin and set in the fridge until firm.
- Dust with icing sugar and slice to serve.
Ginger Biscuit Tiramisu
Tiramisu is a dinner party favourite. One of those dishes that never fails to wow despite its simplicity. But have you have thought of making it with a different biscuit? We tried it with our ginger and date biscuits for a flavour/texture update and it worked really well. It takes on an almost sticky toffee pudding quality.
1 pack Bush Cookies ginger and date biscuits
400ml whipping cream
250g mascarpone
75ml marsala
1 tsp lemon zest
2 tbsp icing sugar
300 ml espresso or strong black coffee
1 tbsp cocoa for dusting
- Lay the biscuits in a shallow dish and pour over the coffee.
- Gently whip the cream together with the mascarpone, lemon zest, marsala and icing sugar.
- Spread the topping over the biscuit layer.
- Dust with the cocoa powder.
- Leave in the fridge for a few hours before serving.
Ready to try out some of these great biscuit ideas? Check out our full range of Australian handmade biscuits to buy online.
Biscuits made easy with the 100 cookie recipe

The 100 cookie recipe has taken the world by storm. A variation of condensed milk cookies, it makes a batch of 100 cookies in just 20 minutes.
This freezer-friendly cookie dough is made with just 4 ingredients – butter, caster sugar, self raising flour and tinned condensed milk.
When it comes to toppings, there’s no limit. With 100 cookies to play with, there is major scope for topping heaven.
We’ve got the full recipe right here, plus plenty of great topping ideas…
Condensed milk cookies
A major point about the 100 cookie recipe is that it is based around a tin of condensed milk. You don’t have to make 100 cookies if you don’t want to – the batch can be scaled down to make less. But then you end up with half a tin of condensed milk kicking around the fridge.
The condensed milk makes the cookies milky sweet and oh so chewy.
Condensed milk cookies are ideal when you need a big batch bake for the school fair or a kids party. The dough is however freezer friendly so you can also just bake what you need and keep the rest for next time.
100 cookie recipe
500g butter
150g caster sugar
395g condensed milk (a tin)
750g self raising flour
- Pre heat the oven to 180C (fan).
- Line your baking trays with parchment paper. Two trays is a good fit for the oven, and who has more than two anyway?
- In a mixing bowl, cream the butter and sugar together until pale and fluffy.
- Beat in the condensed milk.
- Mix in the flour, in stages. You may need your hands at the end to work all the flour into the dough.
- Take what you will use, and divide out into bowls for adding different flavours.
- Flavour each batch as you would like.
- Roll the mixture into 1 inch balls (a generous teaspoon) and place on the trays with space between for them to spread.
- Press down lightly with a fork.
- Bake for 10 minutes and allow to cool slightly before transferring to a wire rack.
- Allow to cool completely before decorating as you choose.
Condensed milk cookies ideas
The flavourings for cookies are best mixed into the dough, but you can take it a step further with drizzles of melted chocolate or frosting. You could even sandwich them together, or make ice cream sandwiches. We have got a great ice cream sandwich recipe right here.
- keep it classic with sprinkles
- add homemade almond butter
- add mini marshmallows
- mix in matcha tea and add a white chocolate drizzle
- mini m&ms are always a favourite
- make it fruity with berry powder
You could of course save yourself the mess and buy your biscuits for kids online…
This article was reproduced on this site with permission from operafoods.com.au the “Bulk Suppliers of Packaged Biscuits”.
See original article:- Biscuits made easy with the 100 cookie recipe
Deep fried ice cream with cornflake biscuit crumb
If there’s one thing better than something fried in breadcrumbs, it is something fried in biscuit crumbs. Oh yes. Many recipes for deep fried ice cream use biscuit crumb and cornflakes, but we have used that classic Australian biscuit – the cornflake biscuit. Fanfare please.
Deep fried food ticks all the boxes. Executed well, it is nothing short of a masterpiece. That crisp crumb, which should be deeply flavoured yet not taste of oil or indeed carry any trace of oil. Then, something soft inside. It is a thing of contrasts. We are primed to find food pleasurable, to seek out fat and flavour.
Add sweet, and creamy, into that equation and you may just have found food heaven. Hot, crisp, sweet exterior and cold, creamy, slightly melting middle.
Where does deep fried ice cream come from?
Although no-ones seems to be able to agree on the exact origin of fried ice cream, it has strong associations with Asian cuisine. It is a popular dessert in Chinese restaurants, but is also seen in Thailand and throughout South East Asia. We have plenty of Asian recipes for you to try if you want to make a meal of it.
How to make deep fried ice cream
The whole point of deep frying is to encase the ingredients in a barrier so that the oil only touches the outside. In a classic egg and crumb technique known as panne, the egg cooks to form a thin yet impenetrable coat. The crumb browns in the oil to create those deeply satisfying flavours. In the case of fried fish, for example, this creates steam inside that cooks the fish and keeps it tender. In the case of ice cream, the crust keeps it cold and prevents it from melting into the oil.
The ice cream needs to be frozen solid. So no soft serve here. You can use a ice cream scoop to create a ball, or use two smaller spoons to roll rough chunks. And you will need to work quickly. Dipped in beaten egg, and then rolled in the crumb, the balls are dropped into hot oil for about 20 seconds. Drained on kitchen paper, they are served hot. Perhaps with a drizzle of chocolate sauce, some whipped cream and a retro cherry.
You can use any ice cream you like, but why not go for a Japanese style with our matcha ice cream recipes?
Deep fried ice cream recipe
Serves 4
500ml ice cream
200g cornflake biscuits
2 eggs
2 tablespoon cold water
- Scoop the ice cream into 4 standard balls, or equivalent smaller balls. Put them on a tray, on greaseproof paper, and refreeze to solid.
- Beat the eggs with the cold water. This thins the egg down and will make your coating less eggy. Set aside.
- Blitz the biscuits to a medium coarse crumb. Also set aside.
- When ready to fry, heat oil in a deep fryer or pan to 190C. It is hot enough when a cube of bread takes 30 seconds to turn a deep golden brown.
- Roll the ice cream balls in the beaten egg using one hand only.
- Roll them in the crumb with the other (dry) hand and make sure they are well coated.
- Drop into the hot oil and fry for about 20 seconds or until they turn a lovely golden brown.
- Drain on kitchen paper, garnish as you wish, and serve hot.
Try making this recipe with our other handmade Australian biscuits. All of our wholesale biscuits and cookies are available to buy in bulk online.